根据尚硅谷k8s视频进行安装
安装虚拟机
- 1台master ,2台node, 1台软路由openwrt | 主机 | 密码 | | | --- | --- | --- | | master | Ww550076@ | | | node1 | chenhaifeng | | | node2 | chenhaifeng | |
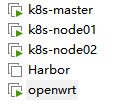
虚拟机安装
- 安装centos7,
- 网络设置选择主机
- 硬盘100g,
- 单文件
- 点击硬盘进入后确认就行,其他不用设置
- 安装过程中设置root密码
- harbor下载地址
wget https://github.com/goharbor/harbor/releases/download/v2.3.4/harbor-offline-installer-v2.3.4.tgz
- 配置
- BOOTPROTO=static
- ONBOOT=yes
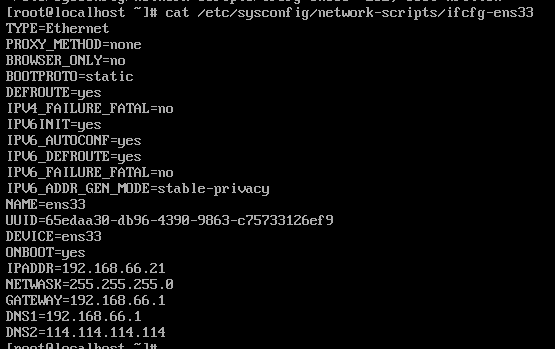
- IPADDR=192.168.66.20 (每台主机的id, 其他设置不同就行)(66.0网段为本地电脑转发到软路由)
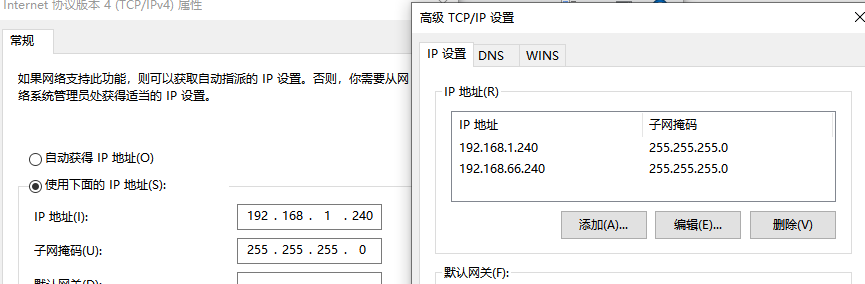

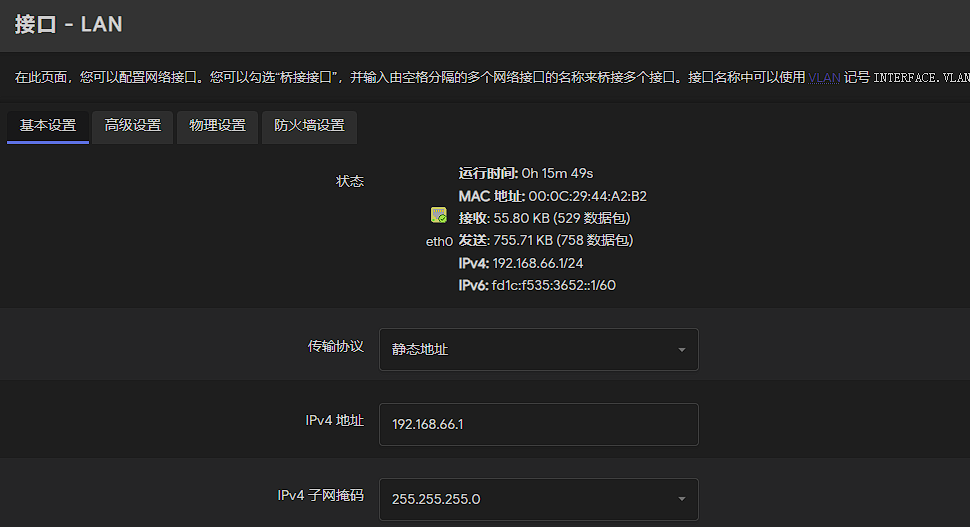
- NETMASK=255.255.255.0
- GATEWAY=192.168.66.1
- DNS1=192.168.66.1
- DNS2=114.114.114.114
主机master
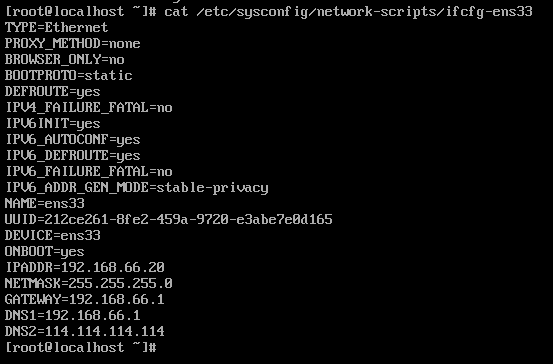 node1
 node2
TYPE=Ethernet
PROXY_METHOD=none
BROWSER_ONLY=no
BOOTPROTO=static
DEFROUTE=yes
IPV4_FAILURE_FATAL=no
IPV6INIT=yes
IPV6_AUTOCONF=yes
IPV6_DEFROUTE=yes
IPV6_FAILURE_FATAL=no
IPV6_ADDR_GEN_MODE=stable-privacy
NAME=ens33
UUID=e7a133db-9061-4c8b-93f0-db7318d08ca4
DEVICE=ens33
ONBOOT=yes
IPADDR=192.168.66.xx
NETMASK=255.255.255.0
GATEWAY=192.168.66.1
DNS1=192.168.66.1
DNS2=114.114.114.114
设置完成后刷新
systemctl restart network # 更新网络配置
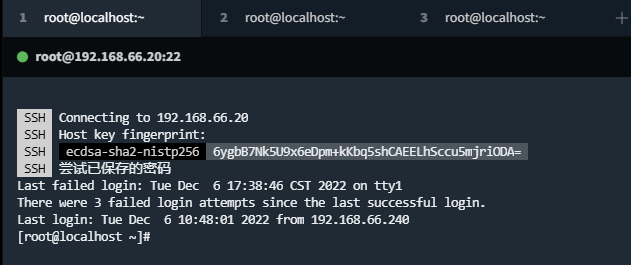
最后测试使用ssh工具连接
系统配置
主机配置
1.设置系统主机名一级host
hostnamectl set-hostname k8s-master

2.设置host文件
vi /etc/hosts
------
[root@localhost ~]# cat /etc/hosts
127.0.0.1   localhost localhost.localdomain localhost4 localhost4.localdomain4
::1         localhost localhost.localdomain localhost6 localhost6.localdomain6
192.168.66.20 k8s-master
192.168.66.21 k8s-node01
192.168.66.22 k8s-node02
------

3.复制Host文件到其他服务器
scp /etc/hosts root@k8s-node01:/etc/hosts
scp /etc/hosts root@k8s-node02:/etc/hosts

4.安装依赖包
yum install -y conntrack ntpdate ntp ipvsadm ipset jq iptables curl sysstat libseccomp wget  vim net-tools git

5.防火墙关闭, 关闭自启
systemctl stop firewalld && systemctl disable firwwalld

6. 安装iptables管理工具, 启动
yum -y install iptables-services && systemctl start iptables

7. 设置为开机自启, 清空规则, 保存规则
systemctl enable iptables && iptables -F && service iptables save


8. 关闭selinux 虚拟内存
swapoff -a && sed -i '/ swap / s/^\(.*\)$/#\1/g' /etc/fstab
setenforce 0 && sed -i 's/^SELINUX=.*/SELINUX=disabled/' /etc/selinux/config
调整内核参数
# 设置文件
cat > kubernetes.conf << EOF
net.bridge.bridge-nf-call-iptables=1
net.bridge.bridge-nf-call-ip6tables=1
net.ipv4.ip_forward=1
net.ipv4.tcp_tw_recycle=0
vm.swappiness=0
vm.overcommit_memory=1
vm.panic_on_oom=0
fs.inotify.max_user_instances=8192
fs.inotify.max_user_watches=1048576
fs.file-max=52706963
fs.nr_open=52706963
net.ipv6.conf.all.disable_ipv6=1
net.netfilter.nf_conntrack_max=2310720
EOF


# 拷贝
cp kubernetes.conf /etc/sysctl.d/kubernetes.conf
# 刷新
sysctl -p /etc/sysctl.d/kubernetes.conf
调整时区
timedatectl set-timezone Asia/Shanghai
timedatectl set-local-rtc 0
systemctl restart rsyslog
systemctl restart crond
关闭不需要的服务
# 关闭邮件服务
systemctl stop postfix && systemctl disable postfix
设置日志系统reyslogd 和 systemd journald
mkdir /var/log/journal # 持久化日志
mkdir /etc/systemd/journald.conf.d

# 1.写入文件
cat > /etc/systemd/journald.conf.d/99-prophet.conf << EOF
[Journal]
Storage=persistent

Compress=yes

SyncIntervalSec=5m
RateLimitInterval=30s
RateLimitBurst=1000

SystemMaxUse=10G

SystemMaxFileSize=200M

MaxRetentionSec=2week

# 不将日志转发到 syslog
ForwardToSyslog=no
EOF

systemctl restart systemd-journald
升级内核
#添加ELRepo 源
rpm -Uvh http://www.elrepo.org/elrepo-release-7.0-4.el7.elrepo.noarch.rpm

# 查看可用版本
yum --disablerepo="*" --enablerepo="elrepo-kernel" list available

# 安装长期支持版本(建议)
yum --enablerepo=elrepo-kernel install kernel-lt -y

# 查看默认内核版本
awk -F\' '$1=="menuentry " {print i++ " : " $2}' /etc/grub2.cfg

# 设置内核自启
grub2-set-default 0
# 设置内核版本
grub2-set-default "CentOS Linux (5.4.225-1.el7.elrepo.x86_64) 7 (Core)"

# 更新
grub2-mkconfig -o /boot/grub2/grub.cfg

# 重启
reboot
kube-proxy开启ipvs的前置条件
modprobe br_netfilter

# 新建文件 ----->注意点(在内核5.4版本中nf_conntrack_ipv4变为nf_conntrack)
cat > /etc/sysconfig/modules/ipvs.modules << EOF
#! /bin/bash
modprobe -- ip_vs
modprobe -- ip_vs_rr
modprobe -- ip_vs_wrr
modprobe -- ip_vs_sh
modprobe -- nf_conntrack_ipv4
EOF


chmod 755 /etc/sysconfig/modules/ipvs.modules && bash /etc/sysconfig/modules/ipvs.modules && lsmod | grep -e ip_vs -e nf_conntrack_ipv4
安装docker
看文档安装

# 创建docker 目录
mkdir /etc/docker

cat > /etc/docker/daemon.json << EOF
{
"exec-opts": ["native.cgroupdriver=systemd"],
"log-driver": "json-file",
"log-opts": {
    "max-size": "100m"
    }
}
EOF


mkdir -p /etc/systemd/system/docker.service.d

systemctl daemon-reload && systemctl restart docker && systemctl enable docker
安装kubeadm(主从[配置)
- 配置阿里云yum镜像
# 配置阿里云镜像
cat > /etc/yum.repos.d/kubernetes.repo <<EOF
[kubernetes]
name=Kubernetes
baseurl=https://mirrors.aliyun.com/kubernetes/yum/repos/kubernetes-el7-x86_64
enabled=1
gpgcheck=1
repo_gpgcheck=1
gpgkey=https://mirrors.aliyun.com/kubernetes/yum/doc/yum-key.gpg https://mirrors.aliyun.com/kubernetes/yum/doc/rpm-package-key.gpg
EOF

# 安装三个工具
yum install -y kubelet kubeadm kubectl

# 开机自启
systemctl enable kubelet.service

# 网上的配置1没用
kubeadm init \
    --apiserver-advertise-address \
    --image-repository registry.aliyuncs.com/google_containers \
    --kubernetes-version \
    --pod-network-cidr \
    --service-cidr \
    --ignore-preflight-errors=all

# 网上配置2没用
kubeadm init \
--image-repository registry.aliyuncs.com/google_containers  \
--service-cidr \
--pod-network-cidr \
--ignore-preflight-errors=Swap
- 配置yaml文件,准备初始化master(失败)
# 1 把yml文件复制
kubeadm config print init-defaults > kubeadm-config.yaml

# 2. 修改vim kubeadm-config.yaml
# 修改点1.advertiseAddress: 192.168.66.20
# 修改点2.name: k8s-master
# 修改点3.podSubnet: "10.244.0.0/16"
# 修改点4 --->在文件末尾添加
---
apiVersion: kubeproxy.config.k8s.io/v1alpha1
kind: KubeProxyConfiguration
featureGates:
  SupportIPVSProxyMode: true
mode: ipvs
---


[root@k8s-master ~]# cat kubeadm-config.yaml
apiVersion: kubeadm.k8s.io/v1beta3
bootstrapTokens:
- groups:
  - system:bootstrappers:kubeadm:default-node-token
  token: abcdef.0123456789abcdef
  ttl: 24h0m0s
  usages:
  - signing
  - authentication
kind: InitConfiguration
localAPIEndpoint:
  advertiseAddress: 192.168.66.20
  bindPort: 6443
nodeRegistration:
  criSocket: unix:///var/run/containerd/containerd.sock
  imagePullPolicy: IfNotPresent
  name: k8s-master
  taints: null
---
apiServer:
  timeoutForControlPlane: 4m0s
apiVersion: kubeadm.k8s.io/v1beta3
certificatesDir: /etc/kubernetes/pki
clusterName: kubernetes
controllerManager: {}
dns: {}
etcd:
  local:
    dataDir: /var/lib/etcd
imageRepository: registry.k8s.io
kind: ClusterConfiguration
kubernetesVersion: 1.25.0
networking:
  dnsDomain: cluster.local
  podSubnet: "10.244.0.0/16"
  serviceSubnet: 10.96.0.0/12
scheduler: {}
---
apiVersion: kubeproxy.config.k8s.io/v1alpha1
kind: KubeProxyConfiguration
featureGates:
  SupportIPVSProxyMode: true
mode: ipvs
# 异常1
mv /etc/containerd/config.toml /tmp/
systemctl restart containerd

# 异常2yaml文件没指定主机名
name: k8s-master
- 初始化1
# 1. 查看kubeadm config所需的镜像
kubeadm config images list
kubeadm config images list --config kubeadm-config.yaml

#执行结果如下
registry.k8s.io/kube-apiserver:v1.25.4
registry.k8s.io/kube-controller-manager:v1.25.4
registry.k8s.io/kube-scheduler:v1.25.4
registry.k8s.io/kube-proxy:v1.25.4
registry.k8s.io/pause:3.8
registry.k8s.io/etcd:3.5.5-0
registry.k8s.io/coredns/coredns:v1.9.3

# 2. 在docker从国内镜像源拉取这些镜像(依次拉取镜像)
docker pull registry.cn-hangzhou.aliyuncs.com/google_containers/kube-apiserver:v1.25.4
docker pull registry.cn-hangzhou.aliyuncs.com/google_containers/kube-controller-manager:v1.25.4
docker pull registry.cn-hangzhou.aliyuncs.com/google_containers/kube-scheduler:v1.25.4
docker pull registry.cn-hangzhou.aliyuncs.com/google_containers/kube-proxy:v1.25.4
docker pull registry.cn-hangzhou.aliyuncs.com/google_containers/pause:3.8
docker pull registry.cn-hangzhou.aliyuncs.com/google_containers/etcd:3.5.5-0
docker pull coredns/coredns:1.9.3

# 3. 改名
docker tag registry.cn-hangzhou.aliyuncs.com/google_containers/kube-apiserver:v1.25.4 registry.k8s.io/kube-apiserver:v1.25.4
...
...
...
...


# 指定用此配置文件
kubeadm init --config=kubeadm-config.yaml --upload-certs | tee kubeadm-init.log
- 初始化方式2(成功方式)
# 成功
kubeadm init \
  --apiserver-advertise-address=192.168.66.20 \
  --kubernetes-version v1.25.0 \
  --service-cidr=10.96.0.0/12 \
  --pod-network-cidr=10.244.0.0/16 \
  --ignore-preflight-errors=all
- 失败重新初始化
kubeadm reset
- 安装成功提示
[root@k8s-master ~]# kubeadm init --config=kubeadm-config.yaml
[init] Using Kubernetes version: v1.25.0
[preflight] Running pre-flight checks
[preflight] Pulling images required for setting up a Kubernetes cluster
[preflight] This might take a minute or two, depending on the speed of your internet connection
[preflight] You can also perform this action in beforehand using 'kubeadm config images pull'
[certs] Using certificateDir folder "/etc/kubernetes/pki"
[certs] Generating "ca" certificate and key
[certs] Generating "apiserver" certificate and key
[certs] apiserver serving cert is signed for DNS names [k8s-master kubernetes kubernetes.default kubernetes.default.svc kubernetes.default.svc.cluster.local] and IPs [10.96.0.1 192.168.66.20]
[certs] Generating "apiserver-kubelet-client" certificate and key
[certs] Generating "front-proxy-ca" certificate and key
[certs] Generating "front-proxy-client" certificate and key
[certs] Generating "etcd/ca" certificate and key
[certs] Generating "etcd/server" certificate and key
[certs] etcd/server serving cert is signed for DNS names [k8s-master localhost] and IPs [192.168.66.20 127.0.0.1 ::1]
[certs] Generating "etcd/peer" certificate and key
[certs] etcd/peer serving cert is signed for DNS names [k8s-master localhost] and IPs [192.168.66.20 127.0.0.1 ::1]
[certs] Generating "etcd/healthcheck-client" certificate and key
[certs] Generating "apiserver-etcd-client" certificate and key
[certs] Generating "sa" key and public key
[kubeconfig] Using kubeconfig folder "/etc/kubernetes"
[kubeconfig] Writing "admin.conf" kubeconfig file
[kubeconfig] Writing "kubelet.conf" kubeconfig file
[kubeconfig] Writing "controller-manager.conf" kubeconfig file
[kubeconfig] Writing "scheduler.conf" kubeconfig file
[kubelet-start] Writing kubelet environment file with flags to file "/var/lib/kubelet/kubeadm-flags.env"
[kubelet-start] Writing kubelet configuration to file "/var/lib/kubelet/config.yaml"
[kubelet-start] Starting the kubelet
[control-plane] Using manifest folder "/etc/kubernetes/manifests"
[control-plane] Creating static Pod manifest for "kube-apiserver"
[control-plane] Creating static Pod manifest for "kube-controller-manager"
[control-plane] Creating static Pod manifest for "kube-scheduler"
[etcd] Creating static Pod manifest for local etcd in "/etc/kubernetes/manifests"
[wait-control-plane] Waiting for the kubelet to boot up the control plane as static Pods from directory "/etc/kubernetes/manifests". This can take up to 4m0s
[apiclient] All control plane components are healthy after 9.002602 seconds
[upload-config] Storing the configuration used in ConfigMap "kubeadm-config" in the "kube-system" Namespace
[kubelet] Creating a ConfigMap "kubelet-config" in namespace kube-system with the configuration for the kubelets in the cluster
[upload-certs] Skipping phase. Please see --upload-certs
[mark-control-plane] Marking the node k8s-master as control-plane by adding the labels: [node-role.kubernetes.io/control-plane node.kubernetes.io/exclude-from-external-load-balancers]
[mark-control-plane] Marking the node k8s-master as control-plane by adding the taints [node-role.kubernetes.io/control-plane:NoSchedule]
[bootstrap-token] Using token: abcdef.0123456789abcdef
[bootstrap-token] Configuring bootstrap tokens, cluster-info ConfigMap, RBAC Roles
[bootstrap-token] Configured RBAC rules to allow Node Bootstrap tokens to get nodes
[bootstrap-token] Configured RBAC rules to allow Node Bootstrap tokens to post CSRs in order for nodes to get long term certificate credentials
[bootstrap-token] Configured RBAC rules to allow the csrapprover controller automatically approve CSRs from a Node Bootstrap Token
[bootstrap-token] Configured RBAC rules to allow certificate rotation for all node client certificates in the cluster
[bootstrap-token] Creating the "cluster-info" ConfigMap in the "kube-public" namespace
[kubelet-finalize] Updating "/etc/kubernetes/kubelet.conf" to point to a rotatable kubelet client certificate and key
[addons] Applied essential addon: CoreDNS
[addons] Applied essential addon: kube-proxy

Your Kubernetes control-plane has initialized successfully!

To start using your cluster, you need to run the following as a regular user:

  mkdir -p $HOME/.kube
  sudo cp -i /etc/kubernetes/admin.conf $HOME/.kube/config
  sudo chown $(id -u):$(id -g) $HOME/.kube/config

Alternatively, if you are the root user, you can run:

  export KUBECONFIG=/etc/kubernetes/admin.conf

You should now deploy a pod network to the cluster.
Run "kubectl apply -f [podnetwork].yaml" with one of the options listed at:
  https://kubernetes.io/docs/concepts/cluster-administration/addons/

Then you can join any number of worker nodes by running the following on each as root:

kubeadm join 192.168.66.20:6443 --token abcdef.0123456789abcdef \
        --discovery-token-ca-cert-hash sha256:d374fd73188fabf60f33e549adce5da111d83719772f817b622133ec3a3de2c5
- 安装提示创建文件
[root@k8s-master ~] mkdir -p $HOME/.kube
[root@k8s-master ~] sudo cp -i /etc/kubernetes/admin.conf $HOME/.kube/config
[root@k8s-master ~] sudo chown $(id -u):$(id -g) $HOME/.kube/config
[root@k8s-master ~] kubectl get node  # 查看节点
- 创建文件夹安装网络插件
cd
mv kubeadm-init.log kubeadm-config.yaml k8s-install/  # 文件移动
cd k8s-install/
mkdir core
mv * core/
mkdir plugin/
cd plugin/
mkdir flannel
cd flannel/
wget https://raw.githubusercontent.com/coreos/flannel/master/Documentation/kube-flannel.yml
kubectl apply -f kube-flannel.yml
- 出现containerd异常解决
[root@master ~]# mv /etc/containerd/config.toml /tmp/
[root@master ~]# systemctl restart containerd
- 切换到每台node节点连接
kubeadm join 192.168.66.20:6443 --token abcdef.0123456789abcdef \
        --discovery-token-ca-cert-hash sha256:d374fd73188fabf60f33e549adce5da111d83719772f817b622133ec3a3de2c5
Harbor主机安装harbor
certificate: /your/certificate/path
private_key: /your/private/key/path

server.crt  server.csr  server.key  server.key.org
所有系统都要配置
cat /etc/hosts

127.0.0.1   localhost localhost.localdomain localhost4 localhost4.localdomain4
::1         localhost localhost.localdomain localhost6 localhost6.localdomain6
192.168.66.20 k8s-master
192.168.66.21 k8s-node01
192.168.66.22 k8s-node02
192.168.66.100 chen.haifeng.com
1.需要先安装docker compose(不能是最新版本)
运行以下命令以下载 Docker Compose 的当前稳定版本:

$ sudo curl -L "https://github.com/docker/compose/releases/download/1.24.1/docker-compose-$(uname -s)-$(uname -m)" -o /usr/local/bin/docker-compose
要安装其他版本的 Compose,请替换 1.24.1。

将可执行权限应用于二进制文件:

$ sudo chmod +x /usr/local/bin/docker-compose
创建软链:

$ sudo ln -s /usr/local/bin/docker-compose /usr/bin/docker-compose
测试是否安装成功:
2.生成https证书
# 在certificate, private_key文件夹下生成ssl证书

openssl genrsa -des3 -out server.key 2048
openssl req -new -key server.key -out server.csr
openssl rsa -in server.key.org -out server.key
openssl x509 -req -days 365 -in server.csr -signkey server.key -out server.crt
chmod a+x *
3.拷贝yml文件
cp harbor.yml.tmpl /root/harbor/harbor.yml

# 修改点:域名1. hostname
# 修改点:证书2. https:certificate, private_key
# Configuration file of Harbor

# The IP address or hostname to access admin UI and registry service.
# DO NOT use localhost or 127.0.0.1, because Harbor needs to be accessed by external clients.
hostname: chen.haifeng.com

# http related config
http:
  # port for http, default is 80. If https enabled, this port will redirect to https port
  port: 80

# https related config
https:
  # https port for harbor, default is 443
  port: 443
  # The path of cert and key files for nginx
  certificate: /your/certificate/path/server.crt
  private_key: /your/private/key/path/server.key

# # Uncomment following will enable tls communication between all harbor components
# internal_tls:
#   # set enabled to true means internal tls is enabled
#   enabled: true
#   # put your cert and key files on dir
#   dir: /etc/harbor/tls/internal

# Uncomment external_url if you want to enable external proxy
# And when it enabled the hostname will no longer used
# external_url: https://reg.mydomain.com:8433

# The initial password of Harbor admin
# It only works in first time to install harbor
# Remember Change the admin password from UI after launching Harbor.
harbor_admin_password: Harbor12345

# Harbor DB configuration
database:
  # The password for the root user of Harbor DB. Change this before any production use.
  password: root123
  # The maximum number of connections in the idle connection pool. If it <=0, no idle connections are retained.
  max_idle_conns: 100
  # The maximum number of open connections to the database. If it <= 0, then there is no limit on the number of open connections.
  # Note: the default number of connections is 1024 for postgres of harbor.
  max_open_conns: 900

# The default data volume
data_volume: /data

# Harbor Storage settings by default is using /data dir on local filesystem
# Uncomment storage_service setting If you want to using external storage
# storage_service:
#   # ca_bundle is the path to the custom root ca certificate, which will be injected into the truststore
#   # of registry's and chart repository's containers.  This is usually needed when the user hosts a internal storage with self signed certificate.
#   ca_bundle:

#   # storage backend, default is filesystem, options include filesystem, azure, gcs, s3, swift and oss
#   # for more info about this configuration please refer https://docs.docker.com/registry/configuration/
#   filesystem:
#     maxthreads: 100
#   # set disable to true when you want to disable registry redirect
#   redirect:
#     disabled: false

# Trivy configuration
#
# Trivy DB contains vulnerability information from NVD, Red Hat, and many other upstream vulnerability databases.
# It is downloaded by Trivy from the GitHub release page https://github.com/aquasecurity/trivy-db/releases and cached
# in the local file system. In addition, the database contains the update timestamp so Trivy can detect whether it
# should download a newer version from the Internet or use the cached one. Currently, the database is updated every
# 12 hours and published as a new release to GitHub.
trivy:
  # ignoreUnfixed The flag to display only fixed vulnerabilities
  ignore_unfixed: false
  # skipUpdate The flag to enable or disable Trivy DB downloads from GitHub
  #
  # You might want to enable this flag in test or CI/CD environments to avoid GitHub rate limiting issues.
  # If the flag is enabled you have to download the `trivy-offline.tar.gz` archive manually, extract `trivy.db` and
  # `metadata.json` files and mount them in the `/home/scanner/.cache/trivy/db` path.
  skip_update: false
  #
  # insecure The flag to skip verifying registry certificate
  insecure: false
  # github_token The GitHub access token to download Trivy DB
  #
  # Anonymous downloads from GitHub are subject to the limit of 60 requests per hour. Normally such rate limit is enough
  # for production operations. If, for any reason, it's not enough, you could increase the rate limit to 5000
  # requests per hour by specifying the GitHub access token. For more details on GitHub rate limiting please consult
  # https://developer.github.com/v3/#rate-limiting
  #
  # You can create a GitHub token by following the instructions in
  # https://help.github.com/en/github/authenticating-to-github/creating-a-personal-access-token-for-the-command-line
  #
  # github_token: xxx

jobservice:
  # Maximum number of job workers in job service
  max_job_workers: 10

notification:
  # Maximum retry count for webhook job
  webhook_job_max_retry: 10

chart:
  # Change the value of absolute_url to enabled can enable absolute url in chart
  absolute_url: disabled

# Log configurations
log:
  # options are debug, info, warning, error, fatal
  level: info
  # configs for logs in local storage
  local:
    # Log files are rotated log_rotate_count times before being removed. If count is 0, old versions are removed rather than rotated.
    rotate_count: 50
    # Log files are rotated only if they grow bigger than log_rotate_size bytes. If size is followed by k, the size is assumed to be in kilobytes.
    # If the M is used, the size is in megabytes, and if G is used, the size is in gigabytes. So size 100, size 100k, size 100M and size 100G
    # are all valid.
    rotate_size: 200M
    # The directory on your host that store log
    location: /var/log/harbor

  # Uncomment following lines to enable external syslog endpoint.
  # external_endpoint:
  #   # protocol used to transmit log to external endpoint, options is tcp or udp
  #   protocol: tcp
  #   # The host of external endpoint
  #   host: localhost
  #   # Port of external endpoint
  #   port: 5140

#This attribute is for migrator to detect the version of the .cfg file, DO NOT MODIFY!
_version: 2.3.0

# Uncomment external_database if using external database.
# external_database:
#   harbor:
#     host: harbor_db_host
#     port: harbor_db_port
#     db_name: harbor_db_name
#     username: harbor_db_username
#     password: harbor_db_password
#     ssl_mode: disable
#     max_idle_conns: 2
#     max_open_conns: 0
#   notary_signer:
#     host: notary_signer_db_host
#     port: notary_signer_db_port
#     db_name: notary_signer_db_name
#     username: notary_signer_db_username
#     password: notary_signer_db_password
#     ssl_mode: disable
#   notary_server:
#     host: notary_server_db_host
#     port: notary_server_db_port
#     db_name: notary_server_db_name
#     username: notary_server_db_username
#     password: notary_server_db_password
#     ssl_mode: disable

# Uncomment external_redis if using external Redis server
# external_redis:
#   # support redis, redis+sentinel
#   # host for redis: <host_redis>:<port_redis>
#   # host for redis+sentinel:
#   #  <host_sentinel1>:<port_sentinel1>,<host_sentinel2>:<port_sentinel2>,<host_sentinel3>:<port_sentinel3>
#   host: redis:6379
#   password:
#   # sentinel_master_set must be set to support redis+sentinel
#   #sentinel_master_set:
#   # db_index 0 is for core, it's unchangeable
#   registry_db_index: 1
#   jobservice_db_index: 2
#   chartmuseum_db_index: 3
#   trivy_db_index: 5
#   idle_timeout_seconds: 30

# Uncomment uaa for trusting the certificate of uaa instance that is hosted via self-signed cert.
# uaa:
#   ca_file: /path/to/ca

# Global proxy
# Config http proxy for components, e.g. http://my.proxy.com:3128
# Components doesn't need to connect to each others via http proxy.
# Remove component from `components` array if want disable proxy
# for it. If you want use proxy for replication, MUST enable proxy
# for core and jobservice, and set `http_proxy` and `https_proxy`.
# Add domain to the `no_proxy` field, when you want disable proxy
# for some special registry.
proxy:
  http_proxy:
  https_proxy:
  no_proxy:
  components:
    - core
    - jobservice
    - trivy

# metric:
#   enabled: false
#   port: 9090
#   path: /metrics
4.运行harbor
# 在harbor解压目录的install文件直接运行
./install
5.打开web端登录
# windoes电脑C:\Windows\System32\drivers\etc\hosts修改
192.168.66.100 chen.haifeng.com

访问地址为
chen.haifeng.com

默认密码
admin
Harbor12345
6.K8s-marter主机连接harbor-推送镜像
格式
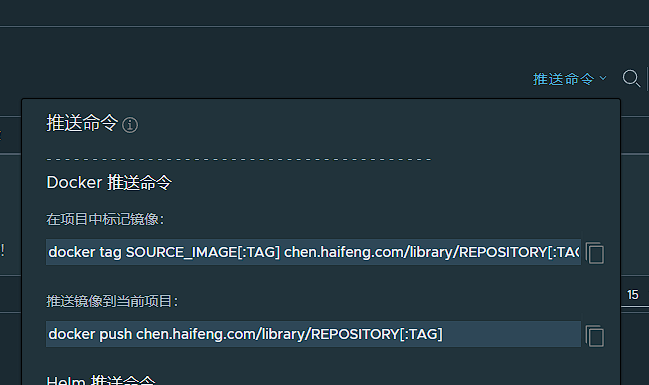 进入k8s-master主机推送镜像
# 登录
docker login https://chen.haifeng.com
user:admin
password:Harbor12345


# 推送镜像
# 1.查看镜像
docker images
# 2.随便找个镜像推送试试 - 需要安装上方图片格式改名
docker tag registry.k8s.io/etcd:3.5.5-0 chen.haifeng.com/library/etcd:3.5.5-0
# 3.推送
docker push chen.haifeng.com/library/etcd:3.5.5-0
